![]()
[Jun 01, 2026] Linux Foundation CKS Real Exam Questions and Answers FREE
Pass Linux Foundation CKS Exam Info and Free Practice Test
The CKS certification exam is ideal for IT professionals who are responsible for designing, deploying, and managing Kubernetes clusters in production environments. It is also suitable for security professionals who want to enhance their knowledge and skills in securing Kubernetes clusters and applications. CKS exam is vendor-neutral, meaning it is not tied to any specific technology or platform, making it widely recognized and valued in the industry.
Linux Foundation CKS (Certified Kubernetes Security Specialist) exam is a certification program designed to validate the skills and knowledge of professionals in securing Kubernetes clusters. As Kubernetes becomes increasingly popular in the world of container orchestration and deployment, the need for skilled and knowledgeable security specialists has become more important than ever.
NEW QUESTION # 10
SIMULATION
Context
A CIS Benchmark tool was run against the kubeadm-created cluster and found multiple issues that must be addressed immediately.
Task
Fix all issues via configuration and restart the affected components to ensure the new settings take effect.
Fix all of the following violations that were found against the API server:
Fix all of the following violations that were found against the Kubelet:

Fix all of the following violations that were found against etcd:
Answer:
Explanation:
See the Explanation below
Explanation:


NEW QUESTION # 11
SIMULATION
Create a RuntimeClass named untrusted using the prepared runtime handler named runsc.
Create a Pods of image alpine:3.13.2 in the Namespace default to run on the gVisor runtime class.
Verify: Exec the pods and run the dmesg, you will see output like this:-
- A. Send us your feedback on it.
Answer: A
NEW QUESTION # 12
Secrets stored in the etcd is not secure at rest, you can use the etcdctl command utility to find the secret value for e.g:- ETCDCTL_API=3 etcdctl get /registry/secrets/default/cks-secret --cacert="ca.crt" --cert="server.crt" --key="server.key" Output
Using the Encryption Configuration, Create the manifest, which secures the resource secrets using the provider AES-CBC and identity, to encrypt the secret-data at rest and ensure all secrets are encrypted with the new configuration.
Answer:
Explanation:
ETCD secret encryption can be verified with the help of etcdctl command line utility.
ETCD secrets are stored at the path /registry/secrets/$namespace/$secret on the master node.
The below command can be used to verify if the particular ETCD secret is encrypted or not.
# ETCDCTL_API=3 etcdctl get /registry/secrets/default/secret1 [...] | hexdump -C
NEW QUESTION # 13
SIMULATION
Enable audit logs in the cluster, To Do so, enable the log backend, and ensure that
1. logs are stored at /var/log/kubernetes-logs.txt.
2. Log files are retained for 12 days.
3. at maximum, a number of 8 old audit logs files are retained.
4. set the maximum size before getting rotated to 200MB
Edit and extend the basic policy to log:
1. namespaces changes at RequestResponse
2. Log the request body of secrets changes in the namespace kube-system.
3. Log all other resources in core and extensions at the Request level.
4. Log "pods/portforward", "services/proxy" at Metadata level.
5. Omit the Stage RequestReceived All other requests at the Metadata level
Answer:
Explanation:
Kubernetes auditing provides a security-relevant chronological set of records about a cluster. Kube-apiserver performs auditing. Each request on each stage of its execution generates an event, which is then pre-processed according to a certain policy and written to a backend. The policy determines what's recorded and the backends persist the records.
You might want to configure the audit log as part of compliance with the CIS (Center for Internet Security) Kubernetes Benchmark controls.
The audit log can be enabled by default using the following configuration in cluster.yml:
services:
kube-api:
audit_log:
enabled: true
When the audit log is enabled, you should be able to see the default values at /etc/kubernetes/audit-policy.yaml The log backend writes audit events to a file in JSONlines format. You can configure the log audit backend using the following kube-apiserver flags:
--audit-log-path specifies the log file path that log backend uses to write audit events. Not specifying this flag disables log backend. - means standard out
--audit-log-maxage defined the maximum number of days to retain old audit log files
--audit-log-maxbackup defines the maximum number of audit log files to retain
--audit-log-maxsize defines the maximum size in megabytes of the audit log file before it gets rotated If your cluster's control plane runs the kube-apiserver as a Pod, remember to mount the hostPath to the location of the policy file and log file, so that audit records are persisted. For example:
--audit-policy-file=/etc/kubernetes/audit-policy.yaml \
--audit-log-path=/var/log/audit.log
NEW QUESTION # 14
You have a Kubernetes cluster that hosts a web application using a Deployment. The Deployment's service exposes the application on port 80. You want to restrict access to the web application to only authorized IP addresses, while allowing access to the Kubernetes API server from any IP address.
Answer:
Explanation:
Solution (Step by Step) :
1. Create a Network Policy:
- Create a Network Policy that allows access to the web application only from the authorized IP addresses.
- Here's an example network policy:
- Replace '10.0.0.0/24' With the authorized IP addresses you want to allow. - This policy allows outbound traffic to any IP address. - Create the policy using 'kubectl apply -f web-app-allow-list.yaml 2. Create a Network Policy for the Kubernetes API Server: - Create a Network Policy that allows access to the Kubernetes API server from any IP address. - Here's an example network policy:
- Create the policy using 'kubectl apply -f api-server-allow-all.yaml 3. Verify the Network Policies: - Use 'kubectl get networkpolicy -n default' to verify that the 'web-app-allow-list' Network Policy is created and 'kubectl get networkpolicy -n kube- system' to verify that the 'api-server-allow-all' Network Policy is created. 4. Test the Access: - Attempt to access the web application from a machine within the authorized IP address range. You should be able to access the application. - Attempt to access the web application from a machine outside the authorized IP address range. You should be unable to access tne application. 5. Verify API Server Access: - Try to connect to the Kubernetes API server from any machine using 'kubectl'. You should be able to connect successfully. Note: This approach assumes that the web application is running in the 'default' namespace. If it's running in a different namespace, adjust the 'namespaces field in the 'web-app-allow-list' Network Policy accordingly.
NEW QUESTION # 15
You are managing a Kubernetes cluster where workloads are spread across multiple nodes- You want to configure Pod Security Policies PSPS to restrict the use of privileged containers and limit the ca abilities of containers running within your cluster.
Answer:
Explanation:
Solution (Step by Step) :
1. Create a Pod Security Policy:
- Create a PSP YAML file named restricted-psp.ya'r:
2. Apply the Pod Security Policy: - Apply the PSP using 'kubectl apply -f restricted-psp.yaml' 3. Create a Deployment using the PSP: - Create a new deployment YAML file named 'test-deployment.yamr that specifies the 'restricted-psp' for the pod's security context:
4. Apply the Deployment: - Apply the deployment using 'kubectl apply -f test-deployment.yaml 5. Test the Restrictions: - Try creating a pod that violates the PSP, for example, using a privileged container. The pod should fail to be created due to the PSP enforcement - Try running a command within a using the deployment that uses the PSP. You should be able to run commands but may have limitations based on the capabilities allowed by the PSP.
NEW QUESTION # 16
You have a Kubernetes cluster with a deployment running a critical application. You need to restrict inbound network access to the pods in this deployment to only allow traffic from a specific service within the cluster. How would you achieve this using NetworkPolicy?
Answer:
Explanation:
Solution (Step by Step):
1. Create a NetworkP01icy: Define a NetworkPoliCY resource that specifies the allowed ingress traffic.
- Name: 'allow-service-access (you can choose any name)
- Namespace: The same namespace as the deployment you want to restrict.
- Spec:
- PodSeIector: This should match the pods in your deployment. You can use labels to select the pods.
- Ingress: This defines the allowed incoming traffic.
- From: Define the source of the allowed traffic.
- PodSeIector: If the traffic is coming from another deployment within the cluster, you can define the pod selector for that deployment.
- Namespaceselector: It the traffic is coming trom a service within the cluster, you can define the namespace selector.
- IPBIock: If the traffic is coming from a specific IP range, you can use 'IP310ck' to define that.
- Ports: This defines the specific ports that are allowed.
- You can either specify individual (e.g., 'tcp:80') or a port range (e.g., 'tcp:80-8080').
2. Apply the NetworkPolicy:
- Use 'kubectl apply -f networkpolicy.yamr to create the NetworkPolicy.
Example YAML for NetworkPolicy:
- The NetworkP01icy allows inbound traffic from any pod in the namespace With label - This traffic can access port 80 (TCP) on the pods with the label 'app: Important Notes: - NetworkPolicies are enforced at the pod level. If no NetworkPolicy is defined, all traffic is allowed by default. - If you need to allow traffic from multiple sources, you can define multiple 'ingress' rules within the NetworkPolicy. - Make sure you have sufficient understanding of Kubernetes Networking and NetworkPolicy concepts before implementing this.
NEW QUESTION # 17
SIMULATION
Enable audit logs in the cluster, To Do so, enable the log backend, and ensure that
1. logs are stored at /var/log/kubernetes/kubernetes-logs.txt.
2. Log files are retained for 5 days.
3. at maximum, a number of 10 old audit logs files are retained.
Edit and extend the basic policy to log:
1. Cronjobs changes at RequestResponse
2. Log the request body of deployments changes in the namespace kube-system.
3. Log all other resources in core and extensions at the Request level.
4. Don't log watch requests by the "system:kube-proxy" on endpoints or
- A. Send us the Feedback on it.
Answer: A
NEW QUESTION # 18
You need to implement a container image vulnerability scanning solution within your Kubernetes cluster. You want to use an external vulnerability scanner API that provides information about vulnerabilities in container images- Explain how you would design and implement this solution.
Answer:
Explanation:
Solution (Step by Step) :
1. choose Vulnerability Scanner:
- Select a reputable vulnerability scanner API that provides a comprehensive database and accurate information about container image vulnerabilities.
- Some options include Aqua Security, Anchore Engine, Snyk, Twistlock, and more.
- Choose a scanner with a suitable API interface for integration with your Kubernetes environment.
2. Implement a Scanner Service:
- Create a Kubernetes service that will communicate with your chosen vulnerability scanner API.
- This service will act as an intermediary between Kubernetes and the external scanner
- The service should be able to:
- Accept image details (registry, image name, tag) as input.
- Send requests to the scanner API to retrieve vulnerability information.
- Process the results from the scanner and format them for Kubernetes.
- (Optional) Store the scan results for future analysis and reporting.
3. Design Scanner Workflow:
- You can trigger scans using different methods:
- Automated Scanning: Implement a mechanism (e.g., a cron job or webhook triggered by image pushes) to automatically scan new images.
- On-Demand Scanning: Allow users to manually request image scans via a command line interface (CLI) or a user interface.
4. Integration with Kubernetes:
- You can integrate your scanner service with Kubernetes using several approaches:
- Admission Webh00k1 Use a wet)h00k to intercept pod creation or updates. The webh00k can send the image details to your scanner service and block pod creation if critical vulnerabilities are detected.
- Custom Resource Definitions (CRDs): Create CRDs to manage image scanning tasks- You can define a "ImageScan" or "Vulnerabilityscan" resource that represents a scan request.
- Deployment Controller: Use a custom controller or operator to manage the scanning process. This allows you to define rules for automatic scanning
and integrate with other Kubernetes resources.
5. Scanner Service Implementation (Example):
- Here's a simplified example using Python and a hypothetical "vulnerability-scanner" APC
python
import requests
import json
6. Handle Scan Results: - After scanning, process the vulnerability information received from the API. - You can: - Store the scan results in a database or log file. - Generate alerts or reports based on the severity of vulnerabilities found. - Integrate with other security tools or dashboards for analysis and remediation.
NEW QUESTION # 19
You are tasked with hardening a Kubernetes cluster running on a public cloud provider. The cluster currently runs Kubernetes version 1.18 and has been exposed to the internet for several months. A security audit has identified several vulnerabilities in the current Kubernetes version, including CVE-2021-25743, which affects all versions prior to 1.22.
How do you upgrade your cluster to Kubernetes 1.22 and patch the vulnerabilities without disrupting the applications running on the cluster?
Answer:
Explanation:
Solution (Step by Step) :
1. Plan the upgrade:
- Identify the workloads running in the cluster.
- Understand the dependencies and configurations of each workload.
- Check compatibility of workloads with the new Kubernetes version.
- Research the recommended upgrade path for your cloud provider.
2. Prepare the environment:
- Create a backup of the cluster configuration. This includes the cluster manifest, service account configurations, and any custom resources.
- Test the upgrade process on a staging environment. This helps to identify potential issues and avoid downtime in the production cluster.
- Identify and fix any issues discovered in the staging environment. This could involve updating application configurations or deploying new versions of workloads.
3. Perform the upgrade:
- Use the recommended upgrade process for your cloud provider. Most cloud providers provide automated tools for Kubernetes upgrades.
- Monitor the upgrade process closely. Keep an eye on logs and metrics for any issues or errors.
- Rollback to the previous version if necessary. Have a plan to revert the upgrade if any critical issues arise.
4. Validate the upgrade:
- Verify,/ that all applications are running as expected. Check application logs, metrics, and functionality to ensure that there are no regressions.
- Confirm that the vulnerabilities have been patched. Use tools like 'kubectl audit or 'kubeadm upgrade' to verify the patched version.
Example using Google Kubernetes Engine:
- Create a new cluster with the desired Kubernetes version (1.22) in the Google Cloud Console.
- Use 'kubectl get nodes --all-namespaces to list the nodes in the existing cluster.
- Use 'kubectl drain' to drain the nodes in the existing cluster-
- Use 'kubectl cordon' to cordon the nodes in the existing cluster.
- Once the nodes are drained and cordoned, use 'kubectl delete node to delete the nodes in the existing cluster
- Join the nodes to the new cluster using 'kuoectl join
- Migrate the applications and configurations from the old cluster to the new cluster
- Delete the old cluster
This process ensures a minimal disruption to the applications during the upgrade, and that the vulnerabilities are patched effectively.
NEW QUESTION # 20
You must complete this task on the following cluster/nodes: Cluster: immutable-cluster Master node: master1 Worker node: worker1 You can switch the cluster/configuration context using the following command:
[desk@cli] $ kubectl config use-context immutable-cluster
Context: It is best practice to design containers to be stateless and immutable.
Task:
Inspect Pods running in namespace prod and delete any Pod that is either not stateless or not immutable.
Use the following strict interpretation of stateless and immutable:
1. Pods being able to store data inside containers must be treated as not stateless.
Note: You don't have to worry whether data is actually stored inside containers or not already.
2. Pods being configured to be privileged in any way must be treated as potentially not stateless or not immutable.
Answer:
Explanation:
k get pods -n prod
k get pod <pod-name> -n prod -o yaml | grep -E 'privileged|ReadOnlyRootFileSystem' Delete the pods which do have any of these 2 properties privileged:true or ReadOnlyRootFileSystem: false
[desk@cli]$ k get pods -n prod
NAME READY STATUS RESTARTS AGE
cms 1/1 Running 0 68m
db 1/1 Running 0 4m
nginx 1/1 Running 0 23m
[desk@cli]$ k get pod nginx -n prod -o yaml | grep -E 'privileged|RootFileSystem'
{"apiVersion":"v1","kind":"Pod","metadata":{"annotations":{},"creationTimestamp":null,"labels":{"run":"nginx"},"name":"nginx","namespace":"prod"},"spec":{"containers":[{"image":"nginx","name":"nginx","resources":{},"securityContext":{"privileged":true}}],"dnsPolicy":"ClusterFirst","restartPolicy":"Always"},"status":{}} f:privileged: {} privileged: true
[desk@cli]$ k delete pod nginx -n prod
[desk@cli]$ k get pod db -n prod -o yaml | grep -E 'privileged|RootFilesystem'
[desk@cli]$ k delete pod cms -n prod Reference: https://kubernetes.io/docs/concepts/policy/pod-security-policy/ https://cloud.google.com/architecture/best-practices-for-operating-containers Reference:
[desk@cli]$ k delete pod cms -n prod Reference: https://kubernetes.io/docs/concepts/policy/pod-security-policy/ https://cloud.google.com/architecture/best-practices-for-operating-containers
NEW QUESTION # 21
Your Kubernetes cluster iS running a web application that requires access to a database hosted on an external Cloud provider. Describe how you can secure the connection between the application and the database using TLS/SSL encryption and identity-based authentication.
Answer:
Explanation:
Solution (Step by Step) :
1. Configure TLS/SSL Encryption:
- Generate Certificate: Obtain a TLS/SSL certificate from a trusted certificate authority (CA) or use a self-signed certificate for development purposes-
- Install Certificate on Database Server: Install the certificate on the database server, making it available to the database service.
- Configure Database Service: Configure the database service to accept connections only over TLS/SSL.
- Configure Application Container:
- Mount Certificate: Mount the TLS/SSL certificate into the application container as a secret.
- Configure Application Code: Update the application code to use the certificate when connecting to the database.
2. Implement Identity-Based Authentication:
- Create Database User: Create a dedicated database user specifically for the web application.
- Grant Permissions: Grant appropriate permissions to the database user, limiting access to the necessary tables and data.
- Use Authentication Plugin: Configure the database service to use an authentication plugin that supports identity-based authentication.
- Generate Database Credentials: Generate database credentials (usemame and password) for the application.
- Store Credentials Secretly: Store the database credentials securely as a Kubernetes secret.
- Access Credentials from Application: Configure the application to access the database credentials from the secret.
3. Connect Application to Database:
- Configure Connection String: Update the application's connection string to use TLS/SSL and the database user credentials.
- Example Connection String:
jdbc:postgresql://database-host:5432/database-name?ssl=true&sslmode=require&user=app user&password=app-password
4. Security Considerations:
- Certificate Validation: Ensure the certificate is validated by the application to prevent man-in-the-middle attacks.
- Secure Credential Management: Implement strong security measures to protect the database credentials stored as secrets.
- Access Control: Limit access to the database to only authorized users and applications.
- Network Isolatiom Consider using network policies to isolate the web application from other workloads and restrict unnecessary network traffic.
NEW QUESTION # 22
Analyze and edit the given Dockerfile
FROM ubuntu:latest
RUN apt-get update -y
RUN apt-install nginx -y
COPY entrypoint.sh /
ENTRYPOINT ["/entrypoint.sh"]
USER ROOT
Fixing two instructions present in the file being prominent security best practice issues Analyze and edit the deployment manifest file apiVersion: v1 kind: Pod metadata:
name: security-context-demo-2
spec:
securityContext:
runAsUser: 1000
containers:
- name: sec-ctx-demo-2
image: gcr.io/google-samples/node-hello:1.0
securityContext:
runAsUser: 0
privileged: True
allowPrivilegeEscalation: false
Fixing two fields present in the file being prominent security best practice issues Don't add or remove configuration settings; only modify the existing configuration settings Whenever you need an unprivileged user for any of the tasks, use user test-user with the user id 5487
Answer:
Explanation:
FROM debian:latest
MAINTAINER [email protected]
# 1 - RUN
RUN apt-get update && DEBIAN_FRONTEND=noninteractive apt-get install -yq apt-utils RUN DEBIAN_FRONTEND=noninteractive apt-get install -yq htop RUN apt-get clean
# 2 - CMD
#CMD ["htop"]
#CMD ["ls", "-l"]
# 3 - WORKDIR and ENV
WORKDIR /root
ENV DZ version1
$ docker image build -t bogodevops/demo .
Sending build context to Docker daemon 3.072kB
Step 1/7 : FROM debian:latest
---> be2868bebaba
Step 2/7 : MAINTAINER [email protected]
---> Using cache
---> e2eef476b3fd
Step 3/7 : RUN apt-get update && DEBIAN_FRONTEND=noninteractive apt-get install -yq apt-utils
---> Using cache
---> 32fd044c1356
Step 4/7 : RUN DEBIAN_FRONTEND=noninteractive apt-get install -yq htop
---> Using cache
---> 0a5b514a209e
Step 5/7 : RUN apt-get clean
---> Using cache
---> 5d1578a47c17
Step 6/7 : WORKDIR /root
---> Using cache
---> 6b1c70e87675
Step 7/7 : ENV DZ version1
---> Using cache
---> cd195168c5c7
Successfully built cd195168c5c7
Successfully tagged bogodevops/demo:latest
NEW QUESTION # 23
SIMULATION
Before Making any changes build the Dockerfile with tag base:v1
Now Analyze and edit the given Dockerfile(based on ubuntu 16:04)
Fixing two instructions present in the file, Check from Security Aspect and Reduce Size point of view.
Dockerfile:
FROM ubuntu:latest
RUN apt-get update -y
RUN apt install nginx -y
COPY entrypoint.sh /
RUN useradd ubuntu
ENTRYPOINT ["/entrypoint.sh"]
USER ubuntu
entrypoint.sh
#!/bin/bash
echo "Hello from CKS"
After fixing the Dockerfile, build the docker-image with the tag base:v2 To Verify: Check the size of the image before and after the build.
- A. Send us the Feedback on it.
Answer: A
NEW QUESTION # 24
Context
A CIS Benchmark tool was run against the kubeadm-created cluster and found multiple issues that must be addressed immediately.
Task
Fix all issues via configuration and restart the affected components to ensure the new settings take effect.
Fix all of the following violations that were found against the API server:
Fix all of the following violations that were found against the Kubelet:

Fix all of the following violations that were found against etcd:
Answer:
Explanation:


NEW QUESTION # 25
SIMULATION
Enable audit logs in the cluster, To Do so, enable the log backend, and ensure that
1. logs are stored at /var/log/kubernetes/kubernetes-logs.txt.
2. Log files are retained for 5 days.
3. at maximum, a number of 10 old audit logs files are retained.
Edit and extend the basic policy to log:
1. Cronjobs changes at RequestResponse
2. Log the request body of deployments changes in the namespace kube-system.
3. Log all other resources in core and extensions at the Request level.
4. Don't log watch requests by the "system:kube-proxy" on endpoints or
Answer:
Explanation:
See the Explanation belowExplanation:


NEW QUESTION # 26
You are working on a Kubernetes cluster and need to analyze the security posture of a user workload running within a container image. The image is built from a Dockefflle tnat pulls code from a public GitHub repository. You need to identify potential security vulnerabilities in the codebase using a static analysis tool.
Answer:
Explanation:
Solution (Step by Step) :
1. Identify the Code Repository:
- Access the public GitHub repository where the source code for the user workload resides.
2. Install KubeLinter:
- Use 'pip install kube-linter' to install KubeLinter on your machine.
3. Configure KubeLinter:
- Create a configuration file for KubeLinter (e.g., 'kube-linter.yaml') with the following content:
4. Run KubeLinter. - Execute the following command to analyze the source code: bash kube-linter --config kube-linter.yaml --path - Replace '/path/to/your/repository/' with the actual path to the GitHub repository's codebase. 5. Analyze the Results: - KubeLinter will output a report highlighting potential security vulnerabilities, coding best practices violations, and other issues detected in the codebase. - Review the findings carefully and prioritize remediation actions based on the severity and impact of the vulnerabilities.
NEW QUESTION # 27
You have a Kubernetes cluster with a deployment named 'web-app' running a web applicatiom You suspect that a specific user with the username 'malicious-user' might be attempting unauthorized access to the cluster To investigate this, you want to use Kubernetes audit logs to identify any attempts made by this user to access resources within your namespace 'my-namespace'.
How would you configure Kubernetes audit logging and filter the logs to isolate potential malicious activity by 'malicious-user within the 'my- namespace' namespace?
Answer:
Explanation:
Solution (Step by Step):
1. Enable Kubernetes Audit Logging:
- Create a ConfigMap named 'audit-policy' with the following content:
- Apply the ConfigMap to the cluster: bash kubectl apply -f audit-policy-yaml 2 Configure the Audit Backend: - Create a ConfigMap named 'audit-sink' with the following content
- Apply the ConfigMap: bash kubectl apply -f audit-sink-yaml 3. Filter Audit Logs: - Use ' kubectl logs -f -n kube-system' to view the audit logs. - Filter tne logs for requests made by 'malicious-user' Within 'my-namespace'- bash kubectl logs -f -n kube-system I grep "user.name=malicious-user" I grep "namespace-my-namespace" - This command will display any audit log entries related to requests made by 'malicious-user' within the my-namespace' namespace. 4. Analyze the Logs: - Examine the logs for suspicious activity, such as attempts to access sensitive resources, perform unauthorized actions, or exploit vulnerabilities. - Use the information gathered from the audit logs to take appropriate security measures. Note: - The 'lever field in the audit policy can be customized to control the level ot detail in the audit logs. For example, 'Metadata' logs only the request metadata, while 'Request' logs all details of the request - The audit logs will be stored according to the configuration of the 'audit-sink' ConfigMap. - This is a basic example. You may need to adjust the filters and analysis techniques based on your specific security requirements.
NEW QUESTION # 28
SIMULATION
You can switch the cluster/configuration context using the following command:
[desk@cli] $ kubectl config use-context prod-account
Context:
A Role bound to a Pod's ServiceAccount grants overly permissive permissions. Complete the following tasks to reduce the set of permissions.
Task:
Given an existing Pod named web-pod running in the namespace database.
1. Edit the existing Role bound to the Pod's ServiceAccount test-sa to only allow performing get operations, only on resources of type Pods.
2. Create a new Role named test-role-2 in the namespace database, which only allows performing update operations, only on resources of type statuefulsets.
3. Create a new RoleBinding named test-role-2-bind binding the newly created Role to the Pod's ServiceAccount.
Note: Don't delete the existing RoleBinding.
Answer:
Explanation:
See the Explanation below
Explanation:


NEW QUESTION # 29
SIMULATION
Documentation
Installing the Sidecar, PeerAuthentication, Deployments
You must connect to the correct host . Failure to do so may result in a zero score.
[candidate@base] $ ssh cks000041
Context
A microservices-based application using unencrypted Layer 4 (L4) transport must be secured with Istio.
Task
Perform the following tasks to secure an existing application's Layer 4 (L4) transport communication using Istio.
Istio is installed to secure Layer 4 (L4) communications.
You may use your browser to access Istio's documentation.
First, ensure that all Pods in the mtls namespace have the istio-proxy sidecar injected.
Next, configure mutual authentication in strict mode for all workloads in the mtls namespace.
Answer:
Explanation:
See the Explanation below for complete solution
Explanation:
Below is the CKS exam-ready, step-by-step solution for QUESTION 15.
Follow exactly in this order. No extra changes.
QUESTION 15 - Istio mTLS (EXAM MODE)
1) Connect to the correct host
ssh cks000041
sudo -i
export KUBECONFIG=/etc/kubernetes/admin.conf
2) Ensure sidecar injection is enabled for the mtls namespace
2.1 Check current namespace labels
kubectl get ns mtls --show-labels
2.2 Enable automatic Istio sidecar injection
kubectl label namespace mtls istio-injection=enabled --overwrite
Verify:
kubectl get ns mtls --show-labels | grep istio-injection
Expected:
istio-injection=enabled
3) Ensure ALL Pods get the istio-proxy sidecar
Existing Pods will not get sidecars automatically.
You must restart workloads in the namespace.
3.1 Restart all Deployments in mtls
kubectl -n mtls rollout restart deployment
3.2 Verify Pods now have 2 containers (app + istio-proxy)
kubectl -n mtls get pods
Then check one Pod:
kubectl -n mtls get pod <pod-name> -o jsonpath='{.spec.containers[*].name}{"\n"}' Expected output includes:
istio-proxy
4) Configure mutual TLS (mTLS) in STRICT mode
4.1 Create a PeerAuthentication for the mtls namespace
cat <<EOF | kubectl apply -f -
apiVersion: security.istio.io/v1beta1
kind: PeerAuthentication
metadata:
name: mtls-strict
namespace: mtls
spec:
mtls:
mode: STRICT
EOF
5) Verify mTLS policy is applied
kubectl -n mtls get peerauthentication
kubectl -n mtls describe peerauthentication mtls-strict
Expected:
Mode: STRICT
6) Final verification (exam confidence check)
6.1 Confirm all Pods are Running
kubectl -n mtls get pods
6.2 Confirm sidecar injection everywhere
kubectl -n mtls get pods -o jsonpath='{range .items[*]}{.metadata.name}{" -> "}{.spec.containers[*].name}{"\n"}{end}' Each line must include istio-proxy.
NEW QUESTION # 30
You are tasked with hardening a Kubernetes cluster to meet the requirements of the CIS Kubernetes Bencnmark. One of the key areas is to implement proper access control and authentication. You need to create a strong authentication mechanism that uses client certificates for authentication, while also using RBAC to define specific roles and permissions for different users.
How would you set up a strong authentication mechanism using client certificates for authentication and configure R8AC to define specific roles and permissions for different users, to comply With the CIS Kubernetes Benchmark?
Answer:
Explanation:
Solution (Step by Step) :
1. Generate Client Certificates:
- use a tool like 'ctssr to generate client certificates for each user who needs access to the cluster.
- Create a separate certificate authority (CA) to issue these Client certificates.
- For each user, create a certificate signing request (CSR) and use the CA to sign the CSR to generate the client certificate and private key.
2. Configure Kubernetes API Server:
- Modify the Kubernetes API server configuration (e.g., '/etc/kubernetes/manifests/kube-apiserver.yaml') to enable client certificate authentication:
- Set '--client-ca-file' to the path of the CA certificate.
- Set '--tls-cen-file' to the path of the API server certificate.
- Set '--tls-private-key-files to the path of the API server private key.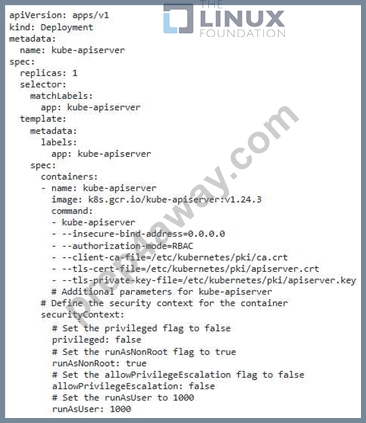
3. Define RBAC Roles: - Use 'kubectr to create RBAC roles for different user groups. - Define roles that map to specific permissions. For example. - 'admin': Full access to the cluster - 'developers: Ability to create and manage resources, but not access sensitive information. - 'viewer': Only able to view resources.
4. Bind Roles to Users: - Create RoleBindings that link the roles to the users who need access to them. - Use the client certificate and private key to authenticate as the user and bind the appropriate role. - You can bind roles to users individually or to groups. 5. Configure 'kubectr' - Configure the 'kubectr command-line tool to use client certificates for authentication. - Set the 'KI-IBECONFIG' environment variable to point to a file containing the client certificate and private key. - Run 'kubectl config set-credentials -client-key -client-certificate to configure the user with the certificate. 6. Verify Configuration: - Test that the configuration works by logging in as different users and verifying that they have the expected permissions.
NEW QUESTION # 31
You are responsible for deploying a Kubernetes cluster on-premises using kubeadm. Ensure the integrity of the kubeadm, kubelet, and kubectl binaries before deploying the cluster.
Answer:
Explanation:
Solution (Step by Step):
1. Download the binaries: Download the kubeadm, kubelet, and kubectl binaries for your desired version from the official Kubernetes release page
(httpswgitnub.com/kubernetes/kllbernetes,treleases](httpswwww.google.com/url?
sa=E&source=gmail&q=httpswgithub.com/kubernetes/kubernetes/releases)).
2. Verify the checksums: Compare the SHA-256 checksums of the downloaded binaries with the checksums provided on the release page.
bash
sna256sum kubeadm kubelet kubectl
3. Verify the signatures (optional): If you require stronger assurance, download the corresponding signature files (.asc) and verify the signatures using
the official Kubernetes public key.
bash
gpg --verify kubeadm.sha256.asc kubeadm
4. Install the binaries: Once you have verified the integrity of the binaries, install them in the appropriate locations on your nodes.
bash
sudo install -o root -g root -m 0755 kubeadm kubelet kubectl /usr/bin/
5. Proceed with cluster deployment: After verifying and installing the binaries, you can proceed with deploying your Kubernetes cluster using kubeadm.
NEW QUESTION # 32
You can switch the cluster/configuration context using the following command:
[desk@cli] $ kubectl config use-context stage
Context:
A PodSecurityPolicy shall prevent the creation of privileged Pods in a specific namespace.
Task:
1. Create a new PodSecurityPolcy named deny-policy, which prevents the creation of privileged Pods.
2. Create a new ClusterRole name deny-access-role, which uses the newly created PodSecurityPolicy deny-policy.
3. Create a new ServiceAccount named psd-denial-sa in the existing namespace development.
Finally, create a new ClusterRoleBindind named restrict-access-bind, which binds the newly created ClusterRole deny-access-role to the newly created ServiceAccount psp-denial-sa
Answer:
Explanation:
Create psp to disallow privileged container
apiVersion: rbac.authorization.k8s.io/v1
kind: ClusterRole
metadata:
name: deny-access-role
rules:
- apiGroups: ['policy']
resources: ['podsecuritypolicies']
verbs: ['use']
resourceNames:
- "deny-policy"
k create sa psp-denial-sa -n development
apiVersion: rbac.authorization.k8s.io/v1
kind: ClusterRoleBinding
metadata:
name: restrict-access-bing
roleRef:
kind: ClusterRole
name: deny-access-role
apiGroup: rbac.authorization.k8s.io
subjects:
- kind: ServiceAccount
name: psp-denial-sa
namespace: development
Explanation
master1 $ vim psp.yaml
apiVersion: policy/v1beta1
kind: PodSecurityPolicy
metadata:
name: deny-policy
spec:
privileged: false # Don't allow privileged pods!
seLinux:
rule: RunAsAny
supplementalGroups:
rule: RunAsAny
runAsUser:
rule: RunAsAny
fsGroup:
rule: RunAsAny
volumes:
- '*'
master1 $ vim cr1.yaml
apiVersion: rbac.authorization.k8s.io/v1
kind: ClusterRole
metadata:
name: deny-access-role
rules:
- apiGroups: ['policy']
resources: ['podsecuritypolicies']
verbs: ['use']
resourceNames:
- "deny-policy"
master1 $ k create sa psp-denial-sa -n development
master1 $ vim cb1.yaml
apiVersion: rbac.authorization.k8s.io/v1
kind: ClusterRoleBinding
metadata:
name: restrict-access-bing
roleRef:
kind: ClusterRole
name: deny-access-role
apiGroup: rbac.authorization.k8s.io
subjects:
# Authorize specific service accounts:
- kind: ServiceAccount
name: psp-denial-sa
namespace: development
master1 $ k apply -f psp.yaml master1 $ k apply -f cr1.yaml master1 $ k apply -f cb1.yaml Reference: https://kubernetes.io/docs/concepts/policy/pod-security-policy/ master1 $ k apply -f cr1.yaml master1 $ k apply -f cb1.yaml master1 $ k apply -f psp.yaml master1 $ k apply -f cr1.yaml master1 $ k apply -f cb1.yaml Reference: https://kubernetes.io/docs/concepts/policy/pod-security-policy/
NEW QUESTION # 33
......
Linux Foundation has recently announced the launch of a new certification exam – the Certified Kubernetes Security Specialist (CKS). CKS exam is designed to assess and validate the skills and knowledge of IT professionals who specialize in securing Kubernetes clusters.
Latest CKS Exam Dumps Linux Foundation Exam: https://certblaster.prep4away.com/Linux-Foundation-certification/braindumps.CKS.ete.file.html